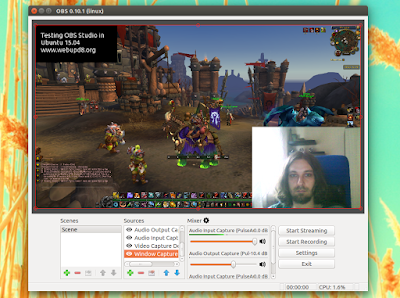
OBS Studio is a free, open source application which allows video recording and live streaming. The app can be used to stream to various popular websites such as Twitch.tv, YouTube, Hitbox.tv, Vaughn Live / iNSTAGIB.tv, DailyMotion, Connectcast.tv, GoodGame.ru, CyberGame.tv, CashPlay.tv along with custom streaming servers.
The original Open Broadcaster Software was rewritten, with the main goal of being multiplatform, along with a more powerful API and a more thorough feature set. The new multiplatform OBS Studio is currently in alpha and is available for Linux, Mac OS X and Windows.
OBS features:
- Encoding using H264 (x264) and AAC;
- Unlimited number of scenes and sources;
- Live RTMP streaming to Twitch, YouTube, DailyMotion, Hitbox and more;
- File output to MP4 or FLV;
- GPU-based game capture for high performance game streaming;
- webcams, capture cards, etc. device support;
- bilinear, bicubic or lanczos3 resampling;
- configurable hotkeys, multiple audio tracks support and more.
In Linux, OBS allows recording a window or a monitor, on top of which you can add various overlays such as an image, text, webcam or media source and of course, audio input (microphone) and output (the game, a music player, etc.), with various options.
Below I'll try to make a quick start guide for streaming to Twitch.tv via OBS running under Linux (Ubuntu in my case). But before that, you can see a quick test I've done earlier with OBS Studio (0.10.1) streaming World of Warcraft to Twitch from Ubuntu 15.04 (there are no video quality settings unfortunately because that's only available for Twitch partners).
Install OBS Studio (Multiplatform) in Ubuntu or Linux Mint
1. Install FFmpeg.
For Ubuntu 14.04 / Linux Mint 17.x / elementary OS Freya and so on, you'll need to add a FFmpeg PPA because these Ubuntu versions don't provide FFmpeg. Add the PPA and install FFmpeg using the following commands:
sudo add-apt-repository ppa:jon-hedgerows/ffmpeg-backports
sudo apt-get update
sudo apt-get install ffmpeg
These FFmpeg packages are backported from Ubuntu 15.04 and they don't overwrite libav so they won't break anything.
For Ubuntu 15.04, FFmpeg is available in the official repositories so to install it, use the following command:
sudo apt-get install ffmpeg2. Install OBS Studio.
To add the official OBS Studio PPA and install the app in Ubuntu 16.04, 15.10 or 14.04, Linux Mint 17.x, elementary OS Freya and so on, use the following commands:
sudo add-apt-repository ppa:obsproject/obs-studio
sudo apt-get update
sudo apt-get install obs-studio
OBS Studio for other Linux distributions (unofficial packages): Arch Linux (AUR - git version), openSUSE and Gentoo.
For other Linux distributions, you'll need to build it from source.
Setting up OBS Studio for streaming to Twitch.tv
1. Add your Twitch Stream Key to OBS
The first thing you'll need to do to be able to stream to Twitch.tv using OBS is to get your Twitch Stream Key from HERE - copy the key and in OBS select "Settings" and on the Stream tab, select "Twitch" under "Service", then paste the key you just copied under "Stream key":
Here you should also select the Twitch server that's closest to you.
2. Add sources
Next, you'll want to add some sources. The first source should be the video (game) source so click the "+" icon under "Sources" and select "Window capture (Xcomposite)", click OK and select the game window:
You can use "Screen capture (XSHM)" instead of "Window capture", but I recommend capturing the window because you'll be able to have other windows on top of the game without them showing up in your live stream.
Then, add any other sources you'd like, like "Video Capture Device" (webcam), "Audio Input Capture" (microphone), "Audio Output Capture" (the sound you hear through the speakers - it can be the game sound, a music player, etc.), text, an image and so on.
Note that the source order is important. For instance, if you're playing a fullscreen game and the webcam source ("Video Capture Device") is under the "Window capture" or "Screen capture" source, it won't show up, so you'll need to move it using the up/down arrows so that the webcam source is above the capture source. The same goes for text and image overlays, etc.
3. Optional configuration tweaks
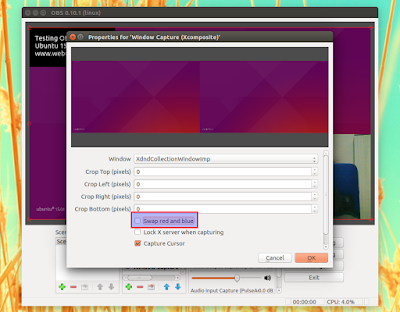
a) if your video colors are incorrect, select the source from the "Sources" list, click "Properties" (it's the third button under "Sources") and enable "Swap red and blue":
b) if your computer has a slow CPU and you're getting a low quality / fps live stream, you can try changing the x264 CPU preset to "superfast" or "ultrafast" (default is "veryfast"):
This can be done via Settings > Output > select "Advanced" for the "Output Mode" from the dropdown > on the Streaming tab scroll down and you'll find an option called "CPU Usage Preset".
If the performance is still bad, you can try setting a lower video resolution and bitrate (these settings can be found in the same "Streaming" tab as the "CPU Usage Preset" - see above).
c) if you have an old computer and/or a bad Internet connection, you may want to decrease the frame rate (default is 30) or, if you have a good computer and Internet connection and you play something like Arena/PvP, you my want to increase it.
The FPS settings can be found in OBS Settings > Video (you can switch to "Integer FPS value" to use a custom value instead of those predefined under "Common FPS Values"):
You may also want to read the official OBS quick start and overview guides (but note that they are for the old OBS version so the UI looks different and some settings maybe not be available any more, etc.).
Report any bugs you may encounter with OBS, HERE.
Report any bugs you may encounter with OBS, HERE.
Also see: Twitch.tv Indicator Lets You Know When The Channels You Follow Go Live


